A Portable 20/30/40m Vertical Antenna
Published July 9, 2018
This post is cross-posted to my ham-radio specific blog, kk9jef.wordpress.com.
Following the Forth of July, I took a few days off of work to recuperate from a grueling work project that we pushed over the finish line on the third. And what better way to relax in the wake of a heatwave than getting out in the beautiful, low-70's weather and working on a new portable HF antenna.

From eBay listing[/caption]
The heart of the antenna is an inexpensive '7.2m' telescoping fishing pole, which can be had for less than $30 with Prime shipping or for less than $10 if you don't mind waiting. The pole weighs about 10 ounces, comes with a small fabric sheath, and collapses down to about 24". I've been wanting to try out something like this since I stumbled across VK3YE and his squid-pole setups awhile back - Peter's also featured these particular poles in another video. Be aware, a pole called "7.2m" may not actually be 7.2 meters from end to end: check the listings carefully:

Note the difference between the "stretch" column and the "specification" column.[/caption]
The length of the pole is enough for a quarter-wave vertical for 20m with some room to spare on either end. To allow for multi-band operation, I added a QRPGuys Tri-Band Vertical accessory to the bottom of the antenna. The piece is essentially just two loading-coils (in this case, iron-powder toroids) with slide-switches to short them out. The 20m configuration is a true quarter-wave vertical; one of the toroids is switched in series for 30m, and both are placed in series for 40m. Ultimately, not a complicated setup. While it would be easy enough to homebrew, the ergonomics of the switches, the hardware to attach the antenna wire and radials, and the clever PCB setup are enough to make it worth the $15 to just buy the darn thing. It even has little notches on the edges of the PCB for straps/ties/rubberbands to attach it to the vertical.
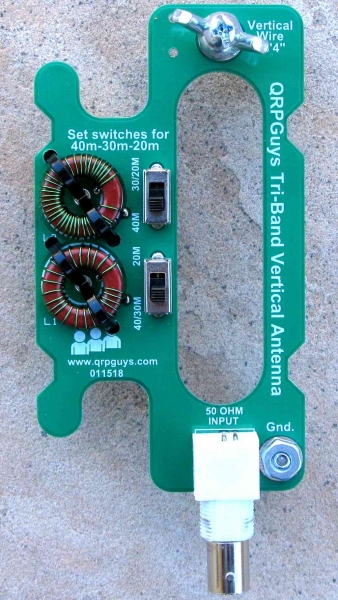
From QRPGuys.com[/caption]
Tuning the antenna is straightforward: you cut a piece of wire (a bit long) for a 20m quarter-wave, and lay out four 10' radials. Then, you bit-by-bit trim down the vertical element to resonate at the desired point in the 20m band. Then you switch in the 30m coil and compress/expand its turns without changing the antenna length to resonate on 30m. Finally, switch in both coils and adjust the second coil to resonate on 40m without changing either the antenna length or the first coil. Voila, a tri-band, base-loaded antenna.
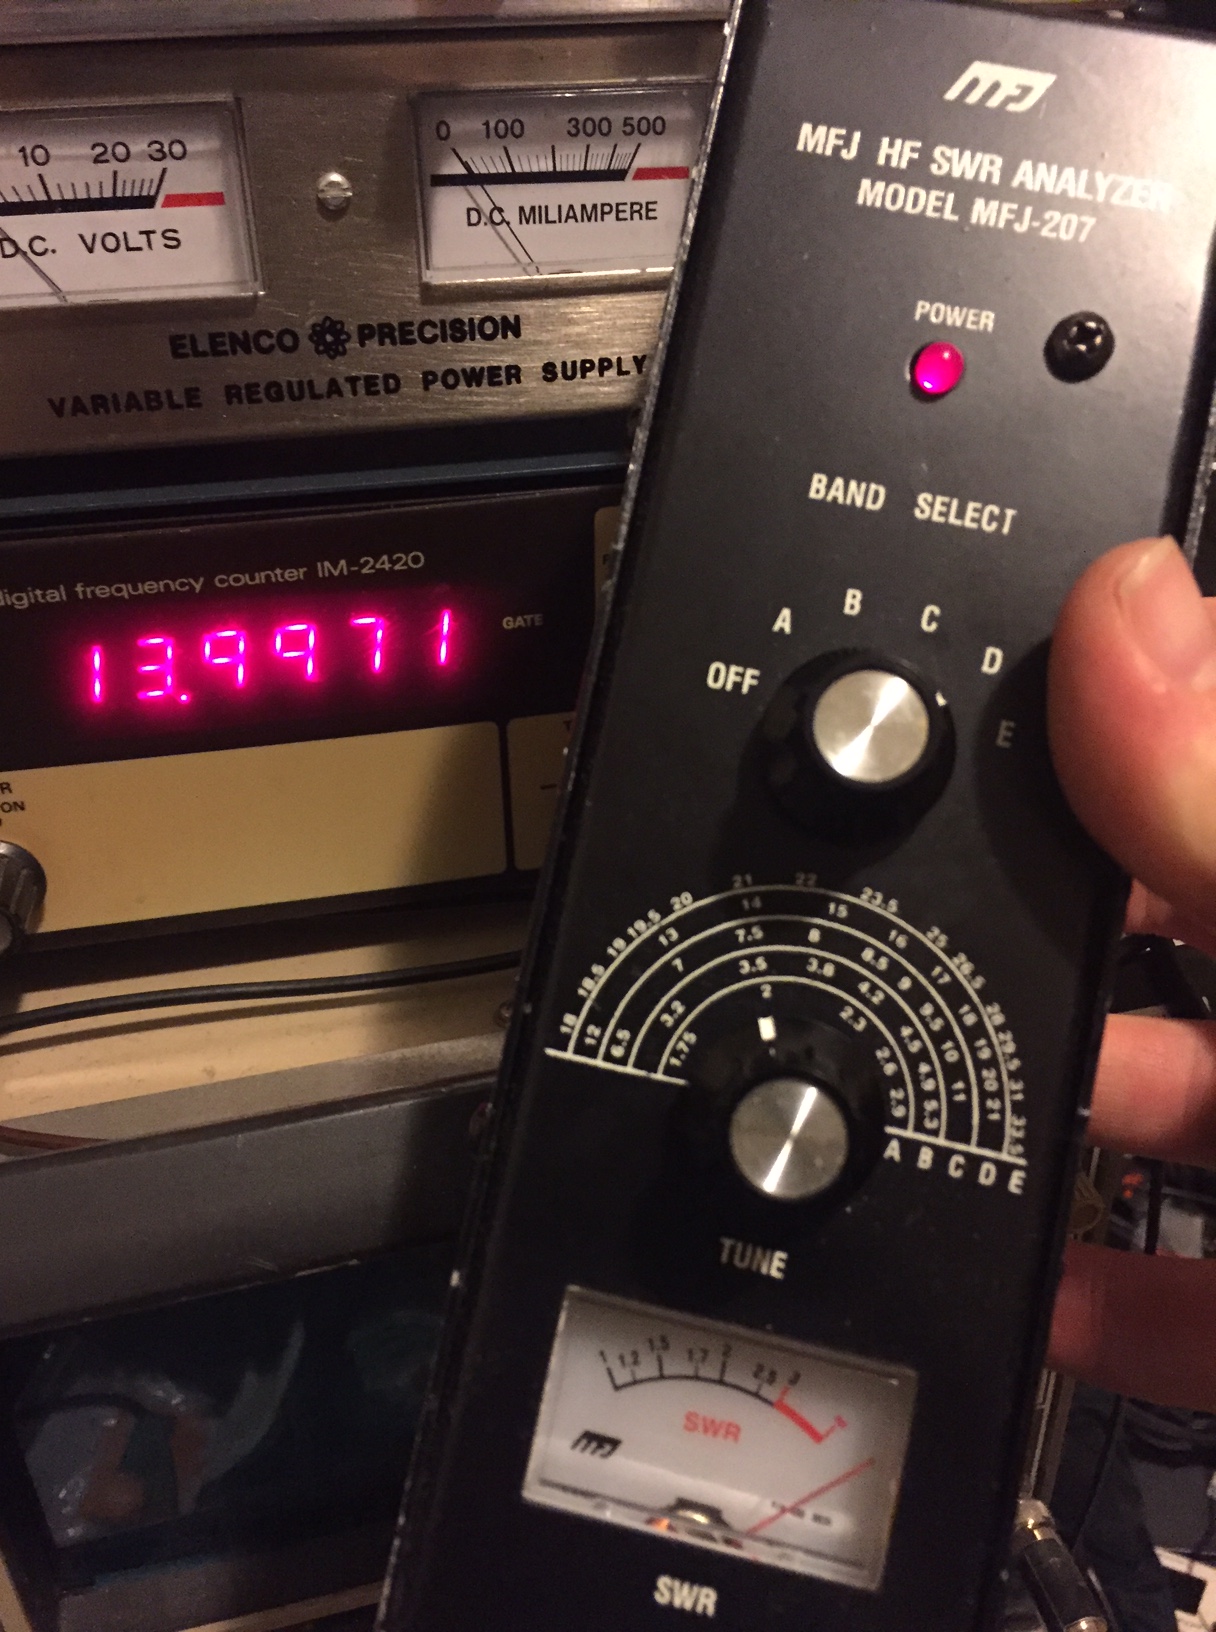
Unfortunately, my antenna analyzer is old school, and doesn't have a frequency readout. It's an old MFJ-207 that I scooped up at the SMCC Hamfest in 2016, and while it does have a port to attach a portable frequency counter, I couldn't find my cheapie one on the day. But I do have a nice Heathkit IM-2420 Frequency Counter with an internal OXCO that I scored an amazing deal on at a hamfest last year (it had an intermittent power switch). So, I attached the MFJ to the antenna, tuned its analog VFO for lowest SWR, walked inside without touching the dail and hooked it up to the frequency counter to see where the center frequency was. Repeat for say the upper and lower 2:1 SWR ranges. Trim the antenna a little, and repeat measurements. Once 20m is tuned, repeat with adjusting the coils for 30m and 40m. A fairly cumbersome process, but for three frequency ranges on one antenna, it was a half-hour project at most.
In the end, the antenna is less than 2:1 SWR across all of the 20m band, all of the 30m band, and all but the top 50 Khz of the 40m band.
I've glossed over the mechanical details of the antenna to this point - the base of the telescoping pole fits snugly-yet-easily into the a piece of 1" schedule-40 PVC pipe. I bought a 5' section from the local big-box store and cut off a ~10" section to hold the antenna. I strapped two ground-stakes that I got at Hamvention this year to the bottom with a couple zip-ties and a couple rubber-bands. Finally, I threaded a long 3/8" eye-bolt though a matching hole about 2" from the bottom of the pipe and secured it with a nut on either side - this acts as both a stop for the pole so it doesn't fall out the bottom, and provides an easy hand- or foot-hold for pressing the stakes into the ground.

The finished antenna mount. It may be getting a coat of high-vis paint in the near future.[/caption]
The setup for the radials was something I stumbled across by chance while buying the PVC pipe. Our local big-box hardware store was having a sale on these RECOIL Brand cable winders that are meant for headphones or charging cables or similar. I've found that they can almost hold four 10', 24-gauge speaker wire radials. This is solving the problem of wires-getting-tangled-in-a-bag that I've had with all my antennas to date. Thank goodness!

A few loose ends are worth it for the assurance that the wires won't get tangled in transit.[/caption]
It takes about 6 minutes to setup or tear down the antenna:
- The stakes are driven into the ground with a firm foot.
- The telescoping pole is unwrapped and placed in the base
- The antenna wire is unwound from the QRPGuys winder and tied to the tip of the telescoping pole with a small bit of cotton-wrapped nylon line (what we'd call tie line). The top section the pole is very flimsy, so I add a second tie to the next-largest section.
- The pole is pushed up to full height, taking the antenna wire with it, which leaves the QRPGuys rig hanging about 2' off the ground.
- The QRPGuys rig is tied to the pole with another bit of tieline.
- The radials are unstrung from their winder, pinched to the ground terminal on the QRPGuys rig, and spread out.
- Run coax to a nearby table/seat/rock.
- Set up radio, battery, key, antenna, and logbook.
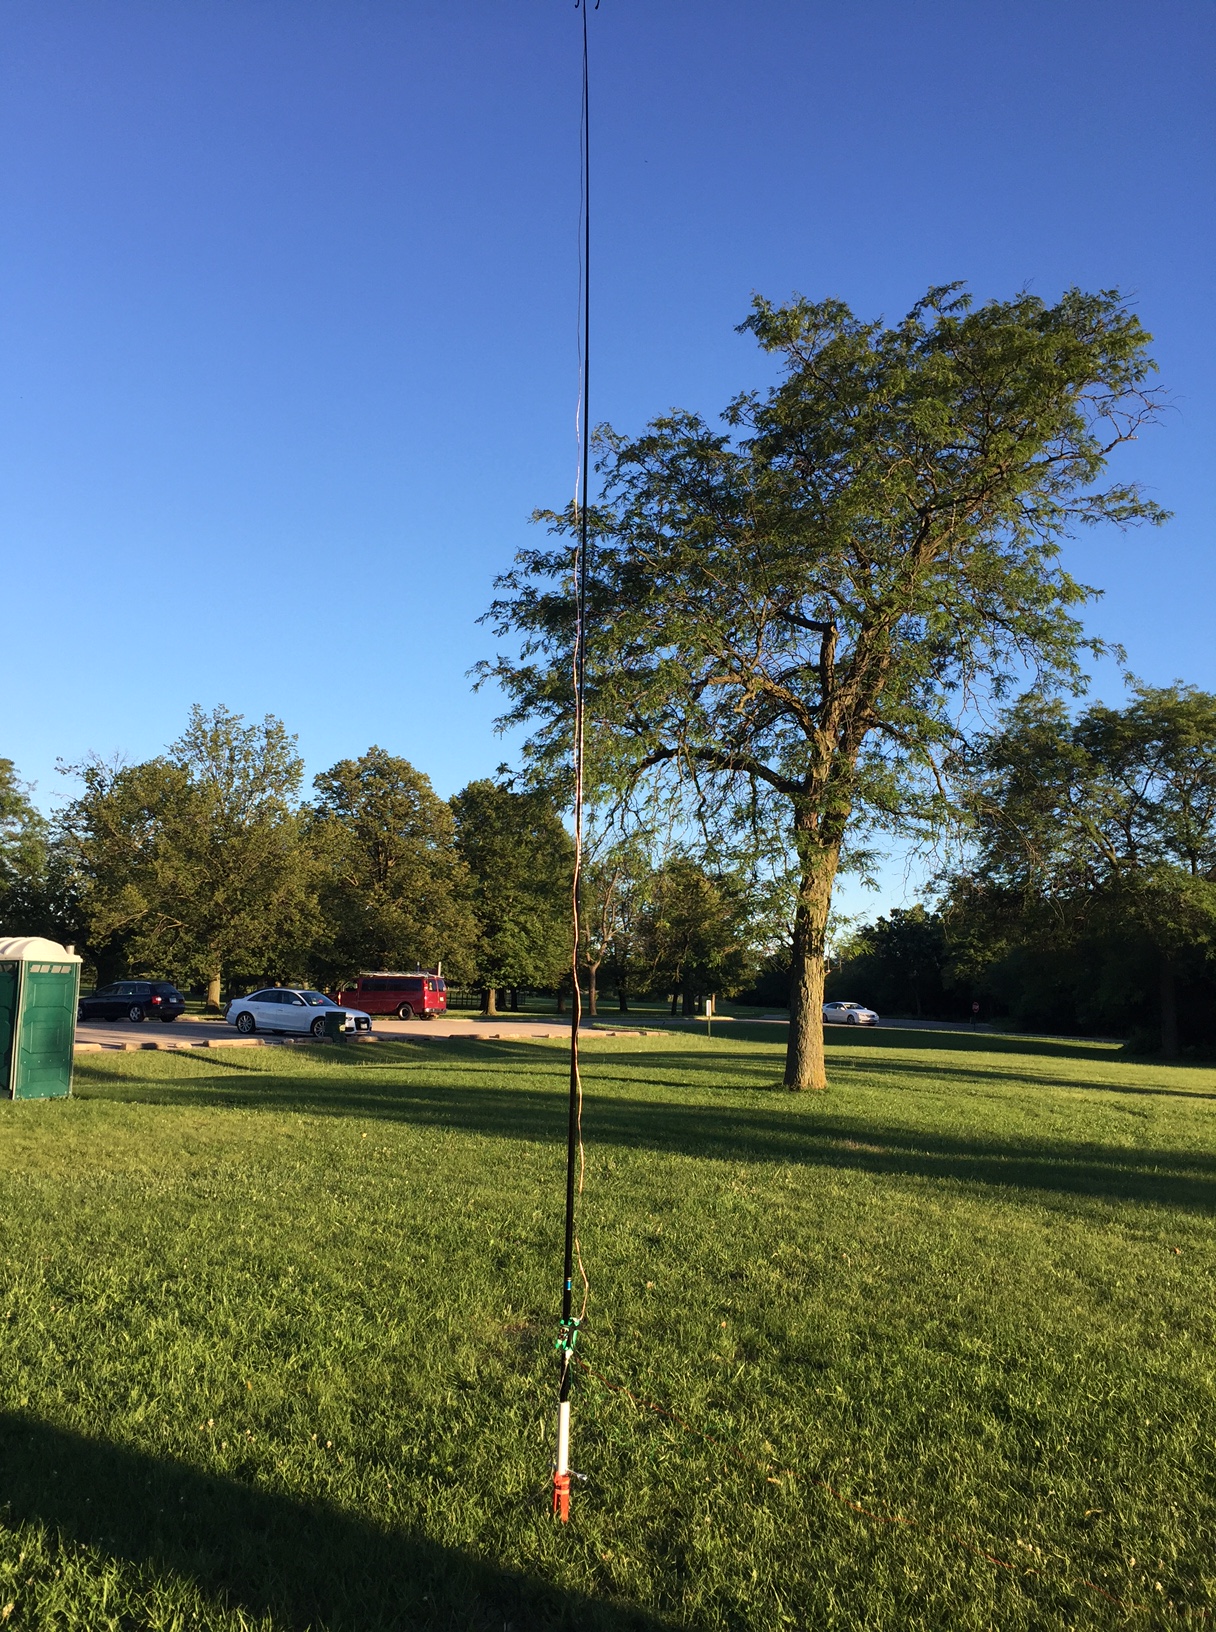
The antenna fully set up and freestanding.[/caption]
Of course, my very first time away from home with the antenna... I forgot the radial wires. D'oh! I was way out in the suburbs, too. I wasn't about to drive an hour home and an hour back for 4 bits of wire, so I first tried out the antenna with no radials (just the coax as a counterpoise). This worked alright - I picked up K2D in CT in the 13 Colonies event on the second call (this at 5W QRP with the ATS-4), but was having trouble with other contacts.
Since I planned to swing by the local Fry's Electronics on this adventure, I decided to pause operating for a while and make that run. Mostly I was picking up parts for an amplifier project (more on that to come), but while I was there, I looked for solutions to my radial problem. I found a 10' section of RJ11 phone cord with 4 wires for $1.69 - perfect! Back out in a new park, I stripped the wires out of their jacket, spread them on the ground, and tied them to the antenna's ground terminal. Instant radials!

And such colorful radials too![/caption]
With the antenna back to spec, things really picked up - surely, being on 20m at sundown didn't hurt either. I scooped K2A (NY), K2B (VA), K2H (MA), K2L (SC), and K2M (PA), as well as the 13-cols bonus station WM3PEN in Philly. Many of these I got on the first or second call, though K2L was a real struggle. There was a very patient operator on the other end though.

The 13 Colonies special operating event runs each year for a week around the 4th of July in the US.[/caption]
I picked up a couple of other interesting stations along the way: PJ2/KB7Q out of Curacao (though the license gives away that he's either an ex-pat or visiting), and CQ918FWC from Madeira Island (!) off the coast of Portugal. There were a number of these World Cup special stations on the bands this week as we close in on the finals. At 3800+ miles away, this was my best DX of the day, and a great proof of concept for the new antenna.
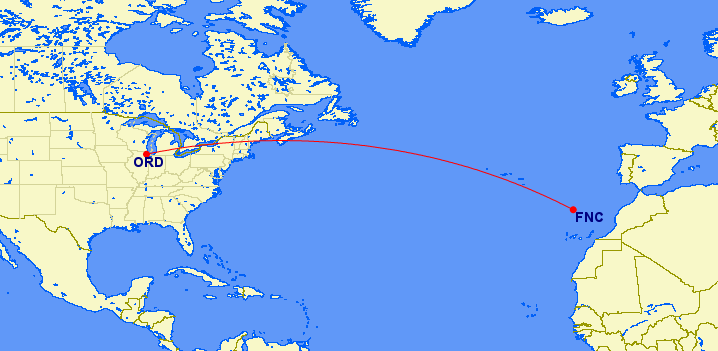
At QRP wattage ,this 3800 mile contact was made at 760 miles/watt.[/caption]
Hear you on the air!
73